
Available on Fitune Pro, Plus, and Ultra plans. Requirement: a valid domain name with access to the domain admin console.
Prefer to have us do it for you? The domain setup service is included at no extra cost on Plus and Ultra plans. If you're on Pro, you can purchase it as an add-on: Domain Setup Service
Step 1: Buy a domain (if you don't have one)
If you already have your own domain, skip to Step 2.
If you don't, you'll need to buy one. We recommend GoDaddy, which is affordable and easy to manage.
Step 2: Add your custom domain to Fitune
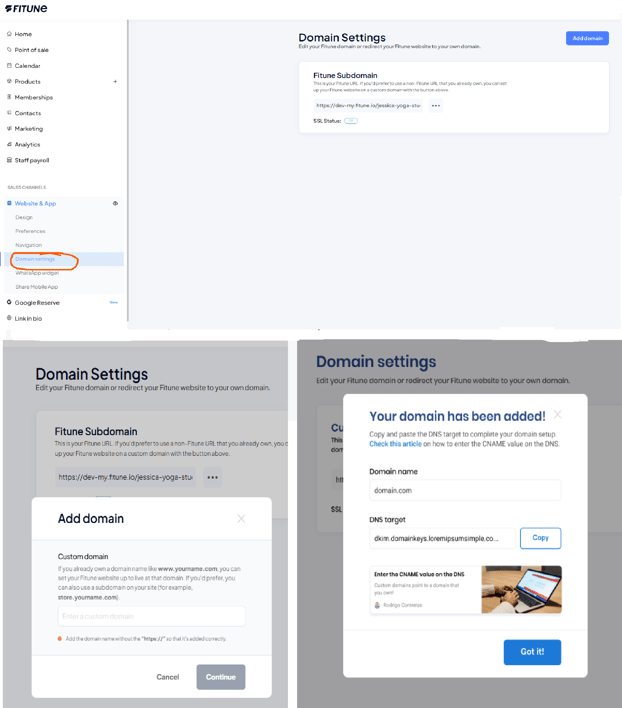
- In your admin, go to Fitune Website → Domain Settings.
- Enter the custom domain where you want your Fitune website to live and click Continue.
You can add your root domain (e.g. www.yourdomain.com) or a subdomain (e.g. classes.yourdomain.com). Don't add http:// or https://.
- You'll see a CNAME value (DNS Target). Copy that value and proceed to Step 3.
Step 3: Add the CNAME record in your domain admin
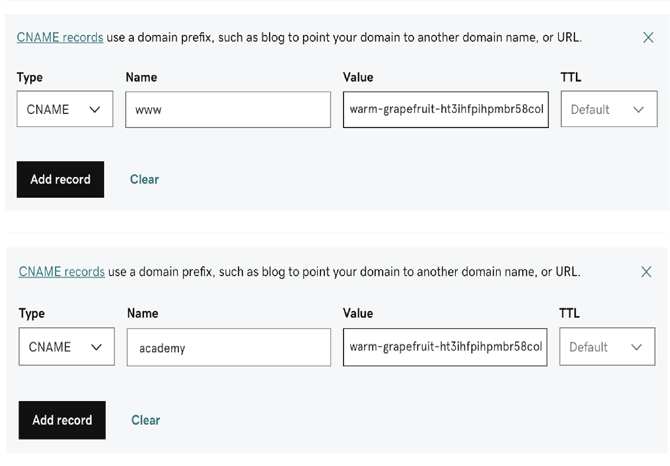
Log in to your domain admin (where you bought your domain) and add a new CNAME record with these values:
- Host / Name / Subdomain:
www(forwww.yourdomain.com) or your chosen subdomain (e.g.classes,academy,online) - Target / Value / Points To: paste the CNAME value provided by Fitune in Step 2
- TTL: keep the default option
Instructions by provider
GoDaddy — Add CNAME record
- Host/Name:
wwwor your chosen subdomain - Points to: paste the CNAME value from Fitune
Hover — Add CNAME record
- Hostname:
wwwor your chosen subdomain - Target Name: paste the CNAME value from Fitune
OVH — Add CNAME record
- Sub-domain:
wwwor your chosen subdomain - Target Name: paste the CNAME value from Fitune
- Note: OVH requires a period at the end of the CNAME value.
Cloudflare — Add CNAME record
- Name:
wwwor your chosen subdomain - Target: paste the CNAME value from Fitune
- Note: make sure to change Proxy Status from Proxied to DNS Only
Other common providers
1and1 · Bluehost · DreamHost · easyDNS · Google Domains · NameCheap · Network Solutions · Squarespace
Step 4: Confirm your domain status
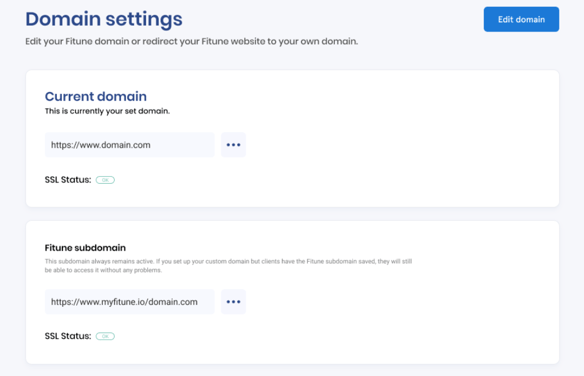
After creating the CNAME, wait until the SSL STATUS on the Fitune domain page shows "OK" in green. Your custom domain will usually be ready within 24–48 hours.
If you want to make sure everything is set up correctly, send us a message in the chat with a screenshot of your DNS settings and we'll verify it for you.
Note: even with a custom domain, your Fitune website remains secure — we provide a free SSL certificate to all Fitune customers.
A note on www domains
If you connected your domain with www.yourdomain.com and want yourdomain.com (without www) to also work, you'll need to set up a redirect with your domain registrar so the non-www version loads the www version.
If your domain provider requires an IP address for the redirect, we recommend using Naked SSL — it's free for a single domain and will provide the A record you need.
Frequently asked questions
▶ Does Fitune host my domain? No. What we do is set up a CNAME record pointing your custom domain to your Fitune website. You must keep an active domain package with your domain registrar to maintain the link.