
Before you start
To connect Fitpass to Fitune, your GYM ID (Studio Code) must be approved by Fitpass. Follow this order, whether you're new to Fitpass or already use it:
- Check your Studio Code in your Fitpass Admin, under Studio, below your studio name. It looks like this: fit-xxxxxxxxxxxxxxxx.
- Send the connection request by email to mariajose@fitpass.mx and tony@fitpass.mx.
Use the email template you'll find at the end of this page. - Wait for Fitpass's reply by email confirming they've accepted your request. You'll get a SUCCESSFUL INTEGRATION email. You'll most likely receive it by the end of the day.
- Enter your Studio Code in the Fitune admin and then connect your schedules by following the steps in this article.
Also keep in mind:
- This integration is available on the Pro, Plus, and Ultra plans.
- Fitpass works with both in-person and virtual locations.
- If you already have schedules created in Fitpass, follow Guide 1 before connecting any class. The order matters so you don't end up with duplicate schedules.
Which guide is yours?
The order of the steps depends on where you're starting:
|
Your situation |
Follow |
|---|---|
|
You already use Fitpass and have schedules created in the Fitpass calendar |
Guide 1 |
|
You're new to Fitpass and don't have any schedules there yet |
Guide 2 |
Both guides share the same last step: Connect your schedules from the Fitune admin to Fitpass.
Guide 1 — You already have schedules in Fitpass
Every schedule you connect from Fitune is created as a new schedule in Fitpass. It doesn't merge with the one you already had. That's why the order matters: first you cancel in Fitpass, then you connect from Fitune. This way you won't end up with duplicate schedules.
Step 1: Get your GYM ID from the Fitpass admin
- Log in to your Fitpass admin account.
- From the side menu, click the Studio button.
- In the General section, you'll see the Studio Code (GYM ID).
- Copy it. ⚠️ You'll enter it in your Fitune admin account once you've requested the integration from Fitpass and received the SUCCESSFUL INTEGRATION email confirming you can use it.
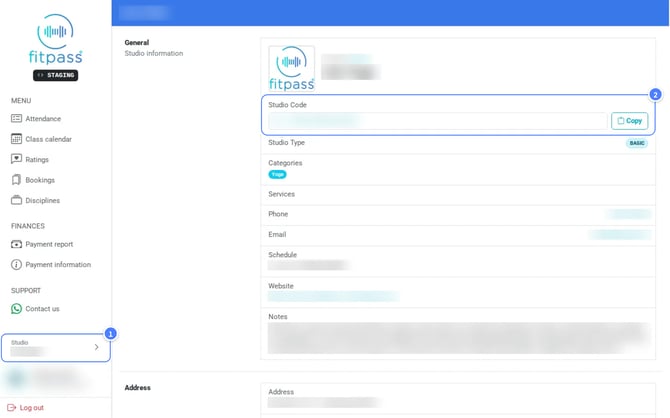
This code looks something like this: fit-xxxxxxxxxxxxxxxx. It's generated automatically by Fitpass and it's a unique number you shouldn't share publicly.
Step 2: Connect your location in Fitune
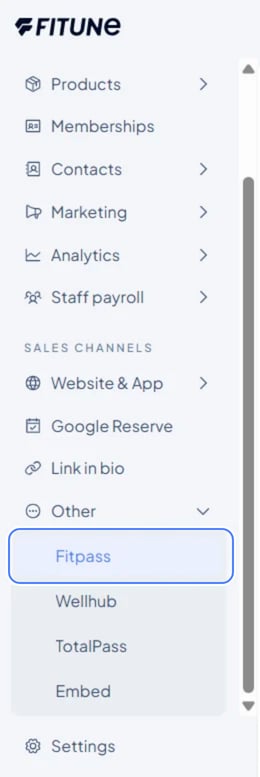
- In Fitune, go to the side menu, Other > Fitpass.
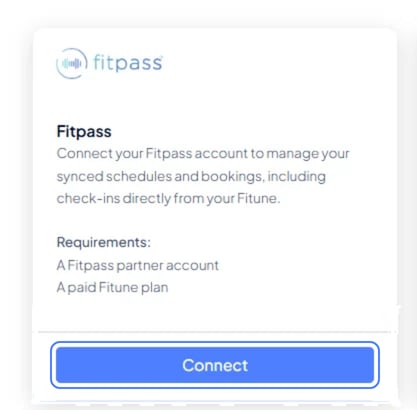
- Or go to Settings > Integrations > Fitpass, and on the Fitpass card, click Connect.
- Find the location you want to connect, paste the GYM ID into its field, and click Connect.
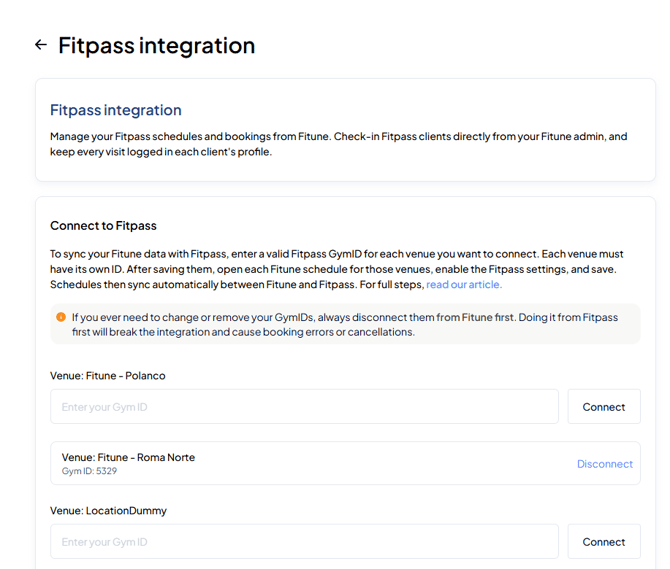
Important: make sure you paste the GYM ID into the right location. The same GYM ID can't be used in more than one location.
The GYM ID must meet these conditions:
- 50 characters max.
- Only letters, numbers, hyphens (-), and underscores (_).
- Special characters like # aren't allowed.
If you need to change or remove a GYM ID later, disconnect it from Fitune first. Doing it from Fitpass first breaks the integration and causes booking errors or cancellations.
Step 3: Cancel in Fitpass the schedules you're going to connect
Every schedule you connect from Fitune is created as a new schedule in Fitpass. It doesn't merge with the one you already had. If you don't cancel the schedule in Fitpass first, you'll end up with two identical schedules, and Fitpass doesn't tell them apart with any label.
Follow this order:
- In the Fitpass Admin, open Class calendar.
- Find the schedules that don't have any bookings yet.
- Click the schedule, then click Cancel class.
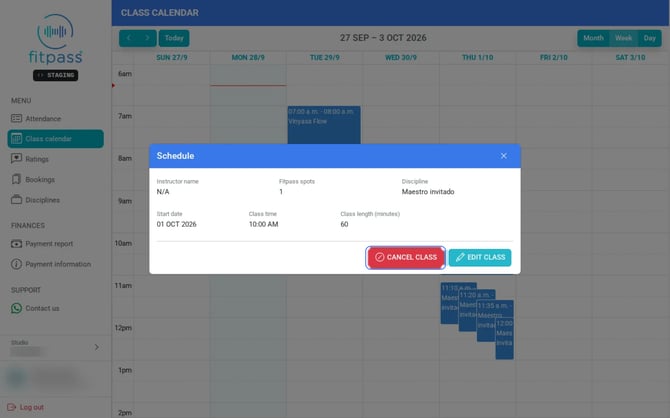
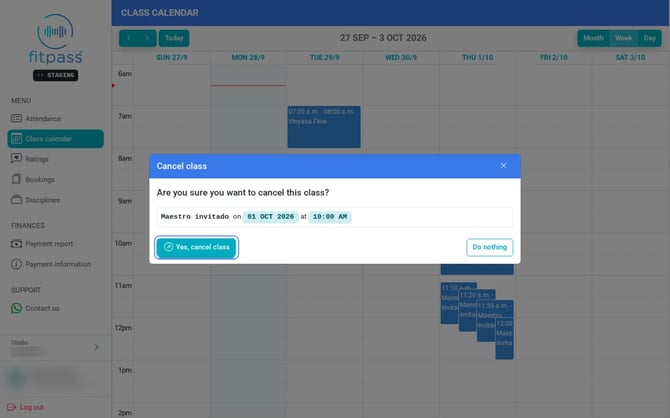
- Confirm with Yes, cancel class.
- Repeat for the upcoming dates of that schedule.
If a schedule already has bookings in Fitpass, don't cancel or connect it yet. Let those bookings happen and make the switch from the following week.
💡 Tip: the Fitpass app only shows users one week ahead. Schedules for later weeks aren't open for booking yet, so you can cancel them in Fitpass and connect them from Fitune right away, without waiting for that week to arrive.
Step 4: Connect your schedules from Fitune
With your schedules canceled in Fitpass, it's time to connect them from Fitune and match each one with its discipline. To do this, scroll down to the Connect your Fitune schedules to Fitpass section, right below Guide 2, and follow the steps there.
Guide 2 — You're new to Fitpass
Step 1: Create a Fitpass account
- Contact the Fitpass team to create your studio account and get your GYM ID. Don't have a Fitpass account yet? Request it directly from Fitpass.
- Once your account is active, you'll find your GYM ID in the Fitpass admin, under Studio > Studio Code.
- Follow the steps at the beginning of this article to request Fitpass's approval by email, using their template.
⚠️ You'll enter it in your Fitune admin account once you've requested the integration from Fitpass and received the SUCCESSFUL INTEGRATION email confirming you can use it.
Step 2: Connect your location in Fitune
- In Fitune, go to the side menu, Other > Fitpass.
- Or go to Settings > Integrations > Fitpass.
- On the Fitpass card, click Connect.
- Find the location you want to connect, paste the GYM ID into its field, and click Connect.
Important: the same GYM ID can't be used in more than one location. It must be 50 characters max and contain only letters, numbers, hyphens (-), and underscores (_).
Step 3: Create your disciplines in Fitpass
In Fitpass, disciplines are the equivalent of your classes in Fitune. They need to exist in Fitpass before you connect any schedule.
- In the Fitpass Admin, open Disciplines and click New.
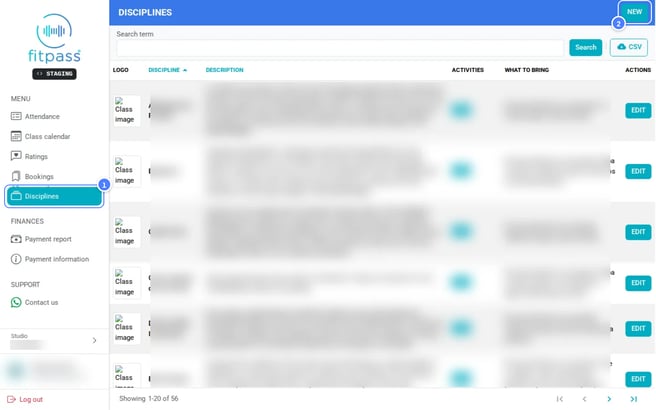
- Fill in Name, What to bring, Description, Logo, and Main activity.
- Click Add discipline.
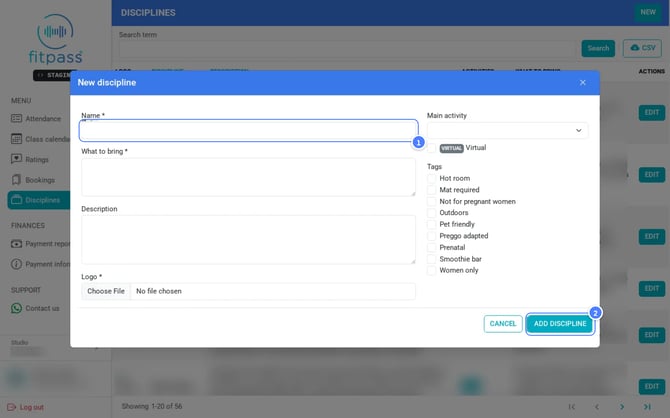
Why does the name matter? The discipline name is what Fitpass users see in the app, not your Fitune class name. Use a clear name and, if you can, the same one as your Fitune class: that way Fitune finds the discipline automatically in the next step.
Step 4: Connect your schedules
With your disciplines created, it's time to choose which schedules from your Fitune calendar will show up in Fitpass and match each one with its discipline. To do this, scroll down to the Connect your Fitune schedules to Fitpass section, right below this guide, and follow the steps there.
Connect your Fitune schedules to Fitpass
This is where you choose which schedules from your Fitune calendar show up in Fitpass, and match each one with its Fitpass discipline.
1. Enable Fitpass on the schedule
Fitpass settings live inside each schedule, next to TotalPass and Wellhub if you also have those integrations active.
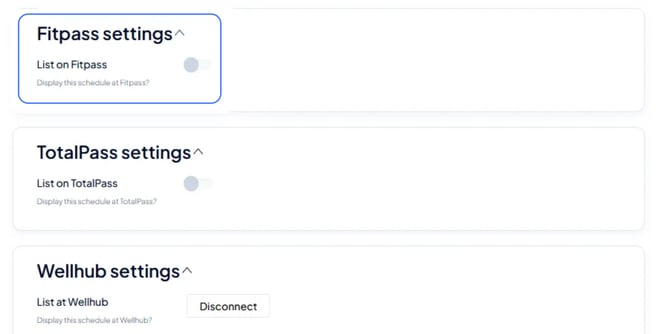
- Go to the calendar and click edit on the schedule you want to enable for Fitpass, or create a new one: Calendar > +New.
- Select the location you connected to Fitpass. The Fitpass Settings section appears automatically.
- Turn on the Fitpass toggle.
- Set the maximum number of spots you want to offer Fitpass users. This number must be equal to or lower than the schedule's total capacity.
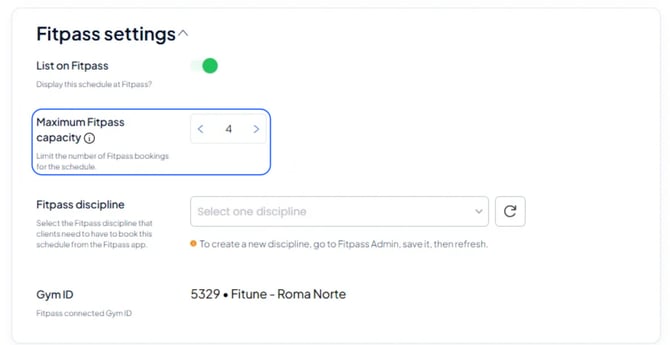
2. Choose the discipline
In Fitpass, disciplines are the equivalent of your classes in Fitune. Why does this matter? The name your Fitpass users see in the calendar is the name of the discipline selected in Fitpass, not your Fitune class name. Choose carefully to avoid confusion.
Fitune looks in Fitpass for a discipline with the same name as your class and selects it automatically. If there's no match, select the discipline manually from the dropdown.
If you just created the discipline in Fitpass and it doesn't show up, refresh the disciplines; it appears after reloading.
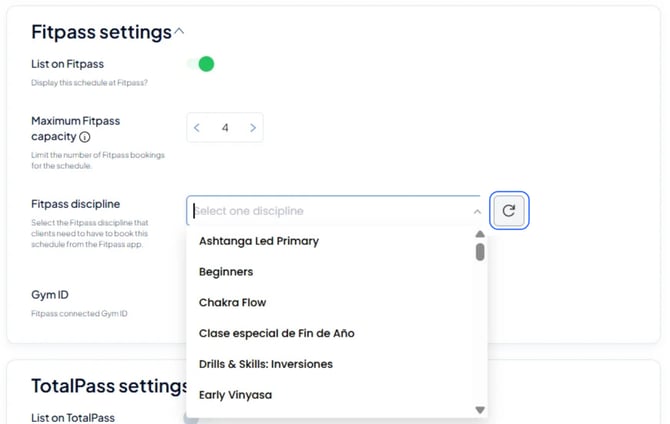
3. Save
- Click Save.
- Choose whether to apply the changes to this schedule only or to all recurrences.
-
Check your schedule list to confirm which ones are connected: connected schedules show the Fitpass badge with the number of spots you assigned. Each integration has its own badge in the schedule list. If you have TotalPass or Wellhub active, you'll see their badges on the schedules connected to each one.
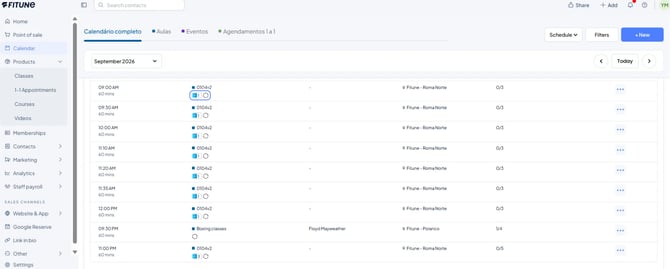
4. Check it in Fitpass
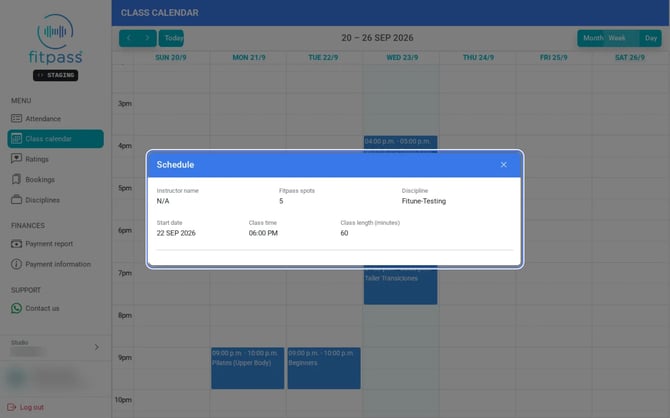
Once saved, the schedule appears in the Fitpass Class calendar , with the discipline you chose and the Fitpass spots you set in Fitune.
Reminder: mark attendance for your Fitpass clients in Fitune
Fitpass pays based on confirmed check-ins and on bookings that weren't canceled at least 4 hours before class. That's why marking attendance for each Fitpass client in Fitune makes sure every visit counts toward your payment.
For connected schedules, mark attendance for Fitpass clients in Fitune, just like you do for your other clients:
- from the Fitune admin, in the class attendance list;
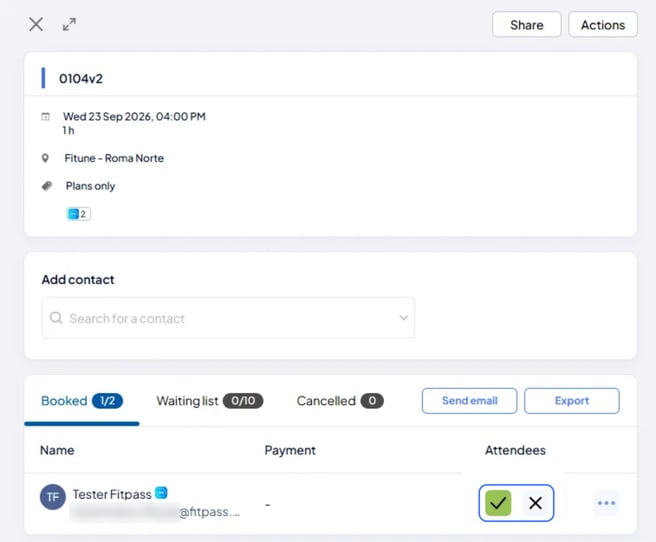
- from the kiosk, by your staff or by the client.
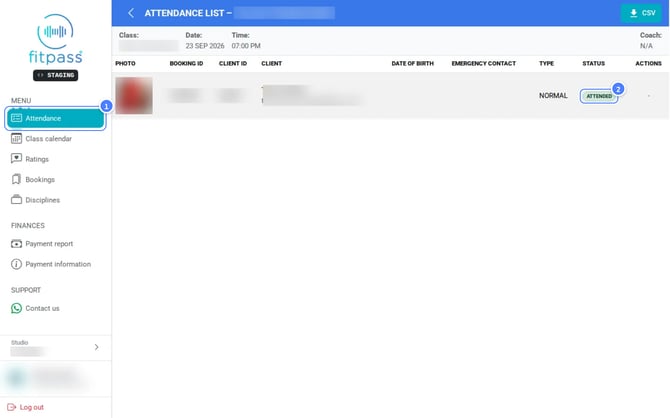
Attendance marked in Fitune shows up in the Fitpass Admin under Attendance, with the status Attended.
You have 48 hours to adjust attendance. You can switch between Attended and No show until 48 hours after the class start time. After that, attendance is locked in Fitune, because Fitpass no longer accepts changes.
💡 Make it a habit: mark attendance during or right after every class. That way you have plenty of time to fix any mistake within the 48 hours. If you can, keep the kiosk available at the front desk so clients can check themselves in.
Billing questions: For any questions regarding Fitpass bookings, no-show payments, or payment rates, please contact Fitpass Support.
After connecting your schedules
- Spots: adjust them from Fitune, in edit schedule > Fitpass Settings. The change syncs to Fitpass automatically, so you no longer need to change it there.
- Changes in Fitpass: don't delete in Fitpass the disciplines or schedules you connected from Fitune. Deleting a connected discipline disconnects the schedule and can cancel bookings. Make all changes from Fitune.
- GYM ID: if you need to change or remove a GYM ID, disconnect it from Fitune first. Doing it from Fitpass first breaks the integration and causes booking errors or cancellations.
- Reports: Fitpass bookings appear in your booking reports and recent attendance, like any other booking at your studio.
- Cancellations and attendance: Fitpass bookings can only be canceled more than 4 hours in advance, and attendance can be adjusted until 48 hours after the class start time.
Booking windows and cancellation policies
The booking windows and cancellation policies you set in Fitune don't apply to Fitpass bookings. Fitpass applies its own rules and policies to its clients.
The same applies the other way around: when your studio cancels a Fitpass booking or adjusts attendance from Fitune, Fitpass's rules apply:
- Cancellations: only when there are more than 4 hours left before class.
- Attendance: can be changed until 48 hours after the class start time.
Fitune applies these rules automatically so bookings and attendance always match on both platforms.
This means a Fitpass booking can come in closer to the class start time than your Fitune window allows. This is expected behavior, not an error.
What Fitune guarantees is capacity: if your class is already full, no more Fitpass bookings come in. No-shows, cancellations, and client penalties are handled by Fitpass directly with the client.
FAQ
▶ How do Fitpass bookings show up in Fitune?
When a Fitpass user books at your studio, Fitune automatically creates a contact profile with the Fitpass logo and their email. The booking is recorded as a single payment, the contact source shows as Fitpass, and Fitune keeps the full history of bookings, cancellations, and attendance.
▶ Can I cancel a Fitpass booking from Fitune?
Yes, as long as there are more than 4 hours left before the class starts. Unlike other integrations, you can cancel Fitpass bookings directly from the Fitune admin.
When there are 4 hours or less left, or the class has already started or ended, the Cancel booking button is disabled. Hover over it to see why. This is a Fitpass rule: it keeps the booking the same on both platforms.
▶ How does check-in work for Fitpass clients?
Unlike other integrations, with Fitpass you can mark attendance from the Fitune admin or the kiosk, either by your staff or by the client.
You can switch a Fitpass booking between Attended and No show as many times as you need, until 48 hours after the class start time. For example, a Monday 9:00 class can be adjusted until Wednesday 9:00. After that, the attendance buttons are disabled. Remember: marking attendance makes sure the visit counts toward your payment.
▶ How do I disconnect a location?
All future Fitpass bookings at that location are canceled automatically. After disconnecting, wait 5 minutes before reconnecting that location or another one, to make sure the disconnection completes correctly and avoid sync issues.
▶ Who pays for bookings made through Fitpass, including bookings without attendance?
Fitpass does. Clients who book through Fitpass don't pay you or Fitune for the class: Fitpass pays your studio. Payment is based on confirmed check-ins and on bookings that weren't canceled at least 4 hours before class. No-shows, cancellations, and client penalties are handled by Fitpass directly with the client. Any questions about these payments should go directly to Fitpass, not Fitune.
Email template to request approval of your GYM ID from Fitpass
- Fill in the details in [brackets] with your studio's information.
- Your Studio Code (GYM ID), which starts with [fit-xxxxxxxxxxxxxxxx], is available in your Fitpass admin, under "Studio", below your studio name.
- Send it to: mariajose@fitpass.mx and tony@fitpass.mx
Subject: Fitpass API access request and partner authorization (Fitune) – [Studio name] – [fit-xxxxxxxxxxxxxxxx]
Content:
Hi Fitpass team,
I'm [Full name], [role: owner, manager, etc.] of [Studio name], and I'm writing to request that our studio's integration with the Fitune platform be enabled through the Fitpass API.
Studio details:
- Studio name: [Studio name as it appears in Fitpass]
- Gym code (Fitpass Admin): [fit-xxxxxxxxxxxxxxxx]
- City / Country: [City, Country]
- Fitpass Admin account email: [email@example.com]
Request:
- Enable Fitpass API access for the studio above.
- Authorize Fitune as a partner to manage the studio's data (Studio Data) on our behalf, including schedules, classes, availability, and general studio information.
I confirm that:
- I'm an authorized representative of the studio above and have the authority to grant this permission.
- I understand that Fitune will be able to view and update the studio's data in Fitpass while this authorization is active.
- I can request to revoke this access at any time by writing to this same email address.
I look forward to your confirmation and to any additional information you may need.
Best regards,
[Full name] [Role] [Studio name] [Phone]